程序员,川流不息


  • 首页

  • 关于

  • 标签

  • 分类

  • 归档

Linux如何获取时间

发表于 2020-08-25 |

背景

这几天和盛哥聊到了系统调用的开销,有些是io,有些是内存,突然提到了尽管像获取时间这种调用,有些对性能要求极高的系统也会做针对性优化。
连”获取时间“都要优化,nginx不就是这么处理么?为什么要这样处理?时间这个基础性的信息底层到底是怎样呢,而高级语言Java/C这些获取时间的方式又是怎么和底层交互的?这个问题激起了我极大的兴趣,希望能通过对“时间”的技术细节做层梳理和探索,加深对操作系统以及Java语言的理解。以生产环境服务器ubuntu为例,设定以下目标

  • C/Java是如何获取当前时间
  • Linux是怎么维护和衡量时间
  • java获取当前时间的原理,是否存在性能问题
  • nginx对获取时间做了什么优化

C/Java是如何获取当前时间

从The Linux Programming Interface 上看,获取时间最常用的函数是 gettimeofday,常见的中间件也是用该函数么?

1
2
3
#include <sys/time.h>
int gettimeofday(struct timeval *tv, struct timezone *tz);
Returns 0 on success, or –1 on error

Redis

扫了下redis的命令,发现redis有个time command. 调用该command能够返回当前服务器的时间戳,从redis源码
)上看,redis也是调用了gettimeofday获取当前的时间

1
2
3
4
5
6
7
8
9
10
void timeCommand(client *c) {
struct timeval tv;

/* gettimeofday() can only fail if &tv is a bad address so we
* don't check for errors. */
gettimeofday(&tv,NULL);
addReplyArrayLen(c,2);
addReplyBulkLongLong(c,tv.tv_sec);
addReplyBulkLongLong(c,tv.tv_usec);
}

Java

Java呢,是怎么获取时间的, System.currentTimeMillis()是java中获取当前时间的基础,java.lang.Date对象的构造也是通过调用System.currentTimeMillis()获取当前时间戳进行初始化。

System源码

1
2
3
4
5
6
7
8
9
10
11
12
13
14
15
16
17
/**
* Returns the current time in milliseconds. Note that
* while the unit of time of the return value is a millisecond,
* the granularity of the value depends on the underlying
* operating system and may be larger. For example, many
* operating systems measure time in units of tens of
* milliseconds.
*
* <p> See the description of the class <code>Date</code> for
* a discussion of slight discrepancies that may arise between
* "computer time" and coordinated universal time (UTC).
*
* @return the difference, measured in milliseconds, between
* the current time and midnight, January 1, 1970 UTC.
* @see java.util.Date
*/
public static native long currentTimeMillis();

好吧,该方法是一个native方法,那就只能继续往jvm源码上看,从jvm源码上看,java获取时间戳最终也是通过gettimeofday获取,殊途同归。

jvm源码os_linux.cpp

1
2
3
4
5
6
jlong os::javaTimeMillis() {
timeval time;
int status = gettimeofday(&time, NULL);
assert(status != -1, "linux error");
return jlong(time.tv_sec) * 1000 + jlong(time.tv_usec / 1000);
}

好,继续往下一个问题

Linux是怎么维护和衡量时间

总的来说,现代操作系统主板上会有个Real Time Clock,记录着当前的时间,通过主板上的电池CMOS Battery维持,假如电池没电了,那我们启动后时间就会出现不正常的情况,通过api去获取时间当然的也会出现相应的问题问题。假如时间出现问题,可以通过手动或者自动的方式校准。

服务器启动的时候就会读取当前时间,保存到kernel,记T1
同时启动TSC,什么是TSC?简单来说就是一个64bit的寄存器,记录着服务器启动以来cpu的cycle,每个cycle的时间就是1/CPU频率,例如cpu 2GHZ, 那么就表示一个cycle的时间是0.5ns
所以获取当前时间的方式就是

1
当前时间 = T1 + TSC * 0.5  //时间的精度为1ns

除了TSC, Linux还有其他方式维护时间,但由于目前主流服务器上都是TSC,所以其他方式的不详述
如何查看当前服务器支持的时间源

1
2
cat /sys/devices/system/clocksource/clocksource0/available_clocksource
tsc hpet acpi_pm

如何查看当前服务器使用的时间源

1
2
cat /sys/devices/system/clocksource/clocksource0/current_clocksource
tsc

Linux最常用的获取时间的接口是gettimeofday, 但除了该方法,Linux还提供了clock_gettime,该api提供了多种获取时间的方式,这里需要注意的是,gettimeofday最终也是调用了clock_gettime就是指定了clockid clock_realtime的时间, 在新版本, linux提供多了一种clockid,CLOCK_REALTIME_COARSE,从manual上看该clockid提供了了一种新的选择“need very fast, but not fine-grained timestamps”。

需要注意的,对于clockid CLOCK_MONOTONIC,这里获取的是一个单调递增的计数器,不受系统时间修改的影响,这个java也会使用到,先记着:)

clockid description
CLOCK_REALTIME System-wide clock that measures real (i.e., wall-clock) time. Setting this clock requires appropriate privileges. This clock is affected by discontinuous jumps in the system time (e.g., if the system administrator manually changes the clock), and by the incremental adjustments performed by adjtime(3) and NTP.
CLOCK_REALTIME_COARSE (since Linux 2.6.32; Linux-specific) A faster but less precise version of CLOCK_REALTIME. Use when you need very fast, but not fine-grained timestamps.
CLOCK_MONOTONIC Clock that cannot be set and represents monotonic time since some unspecified starting point. This clock is not affected by discontinuous jumps in the system time (e.g., if the system administrator manually changes the clock), but is affected by the incremental adjustments performed by adjtime(3) and NTP.
CLOCK_MONOTONIC_COARSE (since Linux 2.6.32; Linux-specific) A faster but less precise version of CLOCK_MONOTONIC. Use when you need very fast, but not fine-grained timestamps.
CLOCK_MONOTONIC_RAW (since Linux 2.6.28; Linux-specific) Similar to CLOCK_MONOTONIC, but provides access to a raw hardware-based time that is not subject to NTP adjustments or the incremental adjustments performed by adjtime(3).
CLOCK_BOOTTIME (since Linux 2.6.39; Linux-specific) Identical to CLOCK_MONOTONIC, except it also includes any time that the system is suspended. This allows applications to get a suspend-aware monotonic clock without having to deal with the complications of CLOCK_REALTIME, which may have discontinuities if the time is changed using settimeofday(2).
CLOCK_PROCESS_CPUTIME_ID (since Linux 2.6.12) Per-process CPU-time clock (measures CPU time consumed by all threads in the process).
CLOCK_THREAD_CPUTIME_ID (since Linux 2.6.12) Thread-specific CPU-time clock.

接下来,我们就来对比各种clockid的性能。
可以参考StackOverflow的这个回答,可以看出
CLOCK_REALTIME和CLOCK_REALTIME_COARSE的性能区别还是比较高,这样对于需要高性能但相对不精确的时间时还是可以选择CLOCK_REALTIME_COARSE的

time (s) => 3 cycles
ftime (ms) => 54 cycles
gettimeofday (us) => 42 cycles
clock_gettime (ns) => 9 cycles (CLOCK_MONOTONIC_COARSE)
clock_gettime (ns) => 9 cycles (CLOCK_REALTIME_COARSE)
clock_gettime (ns) => 42 cycles (CLOCK_MONOTONIC)
clock_gettime (ns) => 42 cycles (CLOCK_REALTIME)
clock_gettime (ns) => 173 cycles (CLOCK_MONOTONIC_RAW)
clock_gettime (ns) => 179 cycles (CLOCK_BOOTTIME)
clock_gettime (ns) => 349 cycles (CLOCK_THREAD_CPUTIME_ID)
clock_gettime (ns) => 370 cycles (CLOCK_PROCESS_CPUTIME_ID)
rdtsc (cycles) => 24 cycles

好吧,上面只是别人的一些经验,直接在服务器上跑测试,可以看出CLOCK_REALTIME平均执行16.15ns, coarse版本的api执行的时间为0, 说明执行的时间小于 1/3.4 ns,好了,至此已经知道Linux常用获取时间的api的效率了

服务器CPU为 3.4GHz

Method min max avg median stdev
CLOCK_REALTIME 14.00 18.00 16.15 16.00 1.24
CLOCK_REALTIME_COARSE 0.00 0.00 0.00 0.00 0.00
CLOCK_MONOTONIC 14.00 19.00 15.88 16.50 1.23
CLOCK_MONOTONIC_RAW 63.00 67.00 64.87 65.00 1.23
CLOCK_MONOTONIC_COARSE 0.00 0.00 0.00 0.00 0.00

java获取当前时间的原理,是否存在性能问题

从上面已知, System.currentTimeMillis()最终调用是到了clock_realtime,该api执行时间大概16ns.
为什么java不用coarse版本的接口呢?从网上查了一轮资料,发现在2017年其实已经有人提了这个问题,具体问题可参考Jdk Issue
简单的说,官方回复是,该执行时间目前不是瓶颈,coarse版本对于旧版本的操作系统不一定支持,需要进行各种兼容判断,会带来额外的性能开销。

java其他时间函数- System.nanoTime()

Java除了System.currentTimeMillis(),还有一个常用的获取时间api, System.nanoTime(). 这个方法容易望文生义,觉得就是返回当前时间戳的纳秒数。在服务器上执行以下代码

1
2
3
4
public static void main(String[] args) {
System.out.println(System.currentTimeMillis());
System.out.println(System.nanoTime());
}

控制台打印

1
2
1598924672863
8616575473749327

这个输出有点奇怪,假如nanoTime输出的是是距离epoch至今的纳秒数,那么理论上值应该是 System.currentTimeMillis() * 10的9次方

从JDK注释上看, “can only be used to measure elapsed time”, 注释说明了该api提供的是作用是度量elapsed time, 而非某个具体的时间,该返回的时间也不受系统时间(wall clock)修改影响,例如ntp的时间矫正或者人工调整时间。

1
2
3
4
5
6
7
8
9
10
11
12
13
14
15
16
17
18
/**
* Returns the current value of the running Java Virtual Machine's
* high-resolution time source, in nanoseconds.
*
* <p>This method can only be used to measure elapsed time and is
* not related to any other notion of system or wall-clock time.
* The value returned represents nanoseconds since some fixed but
* arbitrary <i>origin</i> time (perhaps in the future, so values
* may be negative). The same origin is used by all invocations of
* this method in an instance of a Java virtual machine; other
* virtual machine instances are likely to use a different origin.

* <p> For example, to measure how long some code takes to execute:
* <pre> {@code
* long startTime = System.nanoTime();
* // ... the code being measured ...
* long estimatedTime = System.nanoTime() - startTime;}</pre>
*

那么nanoTime有什么应用场景呢,其实在jdk里面有些类也特意使用了nanoTime.
Java有个比较经典的问题,为什么使用ScheduledThreadPoolExecutor而非Timer.
Java Concurrency in Practice 里对比Timer和ScheduledThreadPoolExecutor提到以下

Timer does have support for scheduling based on absolute, not relative time, so that tasks can be sensitive to changes in the system clock; ScheduledThreadPoolExecutor supports only relative time.

这个的意思是对于Timer的定时任务,会受到系统时间的影响,为什么呢?
因为Timer计算执行时间是通过System.currentTimeMillis(), 该时间是绝对时间,修改了系统时间,该时间相应就产生了变化

1
2
3
4
5
public void schedule(TimerTask task, long delay) {
if (delay < 0)
throw new IllegalArgumentException("Negative delay.");
sched(task, System.currentTimeMillis()+delay, 0);
}

而ScheduledThreadPoolExecutor是通过nanoTime获取时间

1
2
3
4
5
6
7
long triggerTime(long delay) {
return now() +
((delay < (Long.MAX_VALUE >> 1)) ? delay : overflowFree(delay));
}
final long now() {
return System.nanoTime();
}

那么nanoTime这个api获取的是什么时间?从jvm源码上看,对于支持supports_monotonic_clock该时间源的,获取的就是CLOCK_MONOTONIC这个时间,这个时间是单调递增, 不受系统时间影响,所以ScheduledThreadPoolExecutor使用该clock source会更加的合理。

os_linux.cpp

1
2
3
4
5
6
7
8
9
10
11
12
13
14
15
jlong os::javaTimeNanos() {
if (Linux::supports_monotonic_clock()) {
struct timespec tp;
int status = Linux::clock_gettime(CLOCK_MONOTONIC, &tp);
assert(status == 0, "gettime error");
jlong result = jlong(tp.tv_sec) * (1000 * 1000 * 1000) + jlong(tp.tv_nsec);
return result;
} else {
timeval time;
int status = gettimeofday(&time, NULL);
assert(status != -1, "linux error");
jlong usecs = jlong(time.tv_sec) * (1000 * 1000) + jlong(time.tv_usec);
return 1000 * usecs;
}
}

nginx是如何做优化

简单说, nginx是通过时间缓存优化时间获取的效率,定时更新缓存,获取时间时从该缓存获取

待补充

补充信息

gettimeofday虽然是存在一定开销,但linux其实已经针对做了很多优化,其实在目前,连系统调用的开销也已经消除了,通过vsdo技术,待持续学习

引用

  1. how-do-computers-keep-track-of-time
  2. select posix clocks
  3. fast equivalent of gettimeofday
  4. HPET vs TSC
  5. the-slow-currenttimemillis

Tomcat对于http keepalive的控制

发表于 2019-08-02 |

背景

项目网关和进程之间采用的是http连接,进程转发有时会出现跨机房的情况,所以通过http keepalive保持长连接是减少延迟的关键,但现实并非完全的长连接。

现象

网关和进程间的请求已经明确了http头非close, 由于http版本是1.1, 所以只要值不是”close”,那么明确的就是需要keepalive.

1
connection:

但现象是,从连接状态上看,还是出现了TIME_WAIT的情况,10.77.1.24是源地址,10.77.1.60:12003是目标服务,TIME_WAIT,就是服务端主动关闭了连接

1
2
3
4
5
6
sudo netstat -apn |  grep "10.77.1.60:12003"
tcp 0 0 10.77.1.24:35720 10.77.1.60:12003 TIME_WAIT -
tcp 0 0 10.77.1.24:37130 10.77.1.60:12003 ESTABLISHED 20750/java
tcp 0 0 10.77.1.24:39472 10.77.1.60:12003 ESTABLISHED 20750/java
tcp 0 0 10.77.1.24:40880 10.77.1.60:12003 ESTABLISHED 20750/java
tcp 0 0 10.77.1.24:40962 10.77.1.60:12003 ESTABLISHED 20750/java

排查

通过tcpdump排查问题

通过在服务器上执行tcpdump, 抓包分析

1
sudo tcpdump -i any host 10.77.1.60 and port 12003

发现一个现象

  1. 每个连接处理一段时间总会关闭,都是客户端也就是网关主动发起的关闭,从上图看,带了Fin标志的包从客户端发往服务端。
  2. 连接持续的时间不等,有60s, 90s, 122s, 151s,都不一定是整数

由于是客户端主动发起的关闭连接,那么排查方向主要从客户端入手,看下有无一些设置时长的判断的逻辑之类,浏览了相关源码,发现并无相关代码。

所以考虑到,会否是服务端发起关闭的请求,客户端被动接受而已。所以看了FIN包的上一个http响应,发现tomcat服务器响应了“Connection: close”的header.

所以连接的重用是控制在tomcat端,通常控制http keepalive的方式有

  1. 连接idle time.
  2. 使用该连接请求的次数。

很明显可以排除第一点,怀疑是第二点的原因。统计了几个有相同情况的情况,发现每个请求都是重用了100次,tomcat就响应了“Connection: close”.

分析tomcat

Keepalive配置项

maxKeepAliveRequests

The maximum number of HTTP requests which can be pipelined until the connection is closed by the server. Setting this attribute to 1 will disable HTTP/1.0 keep-alive, as well as HTTP/1.1 keep-alive and pipelining. Setting this to -1 will allow an unlimited amount of pipelined or keep-alive HTTP requests. If not specified, this attribute is set to 100.

checkout tomcat源码

1
2
3
git clone  https://github.com/apache/tomcat.git 
//checkout项目使用到的版本8.5.31
git checkout 18fac60288

浏览处理http响应的代码,截取部分源码

Http11Processor

1
2
3
4
5
6
7
8
9
10
11
12
13
14
15
16
17
18
19
20
21
public SocketState service(SocketWrapperBase<?> socketWrapper) {
if (maxKeepAliveRequests == 1) {
keepAlive = false;
} else if (maxKeepAliveRequests > 0 &&
socketWrapper.decrementKeepAlive() <= 0) {
keepAlive = false;
}
}

protected final void prepareResponse() throws IOException {

if (!keepAlive) {
// Avoid adding the close header twice
if (!connectionClosePresent) {
headers.addValue(Constants.CONNECTION).setString(
Constants.CLOSE);
}
} else if (!http11 && !getErrorState().isError()) {
headers.addValue(Constants.CONNECTION).setString(Constants.KEEPALIVE);
}
}

总结

  1. tomcat作为服务端,通过maxKeepAliveRequests参数控制keepalive连接数的最大支持的数量,默认值为100.
  2. 除了maxKeepAliveRequests这个参数,tomcat还提供keepAliveTimeout,控制连接空闲的时间,默认是20秒。
  3. 这两个控制正对应着http1.1规范对于keepalive的定义。

浅谈Java中的TCP超时

发表于 2019-07-23 |

背景

在远程调用的世界里,Timeout的情况非常常见,几乎每段时间就会听到几个同事关于Timeout各种情况的讨论,偶尔的会出现不同开发语言间的同事的讨论,例如read timeout, 语言的隔阂使得大家讨论的都不知道是否是同一回事。

对于Java,各种远程调用,http,hessian,dubbo什么的,抛个timeout异常也是常见的事情,timeout是什么,一般追追源码,追到最后发现是个native方法,看着javadoc, 了解得不甚透彻。 所以本文尽量从Java到操作系统层面尝试说明常见的各种Timeout。

主要内容

现象

对于Java开发来说,最常见的异常莫过于SocketTimeoutException,从异常日志,一般会有两种情况

  • connect timed out
  • read timed out
1
2
3
4
5
6
7
8
9
10
11
12
13
Caused by: java.net.SocketTimeoutException: connect timed out
at java.net.PlainSocketImpl.socketConnect(Native Method)
at java.net.AbstractPlainSocketImpl.doConnect(AbstractPlainSocketImpl.java:345)
at java.net.AbstractPlainSocketImpl.connectToAddress(AbstractPlainSocketImpl.java:206)
at java.net.AbstractPlainSocketImpl.connect(AbstractPlainSocketImpl.java:188)
at java.net.SocksSocketImpl.connect(SocksSocketImpl.java:392)
at java.net.Socket.connect(Socket.java:589)

java.net.SocketTimeoutException: Read timed out
at java.net.SocketInputStream.socketRead0(Native Method)
at java.net.SocketInputStream.socketRead(SocketInputStream.java:116)
at java.net.SocketInputStream.read(SocketInputStream.java:170)
at java.net.SocketInputStream.read(SocketInputStream.java:141)

原理 connect timed out

“connect timed out”从字面上看就是连接的超时时间,那么超时时间是怎么控制的?

java.net.Socket

从Sokcet的connect方法可以看出,timeout参数会一致往下传递,最后到了PlainSocketImpl.socketConnect的native方法, java native方法是否真的很神秘?也不神秘,让我们一起看下JVM底层的实现,以下是jdk8-openjdk的源码

PlainSocketImpl.c

以下只截取部分重要的源码, 从源码上看,没设置超时时间时,jvm采用 connect的传统阻塞式方式,反之,则采用select/poll非阻塞式的方式, 由于poll/select都是得采用轮询的方式,在客户端没有设置超时的时候,采用轮询会带来不必要的开销,所以没设置超时时采用connect的阻塞方式是合理的

1
2
3
4
5
6
7
8
9
10
11
12
13
14
15
16
17
18
19
20
21
22
23
24
25
26
27
28
29
30
31
32
33
34
35
36
37
38
39
40
41
42
43
44
45
46
47
48
49
50
51
52
53
54
55
56
57
58
59
60
61
62
63
64
JNIEXPORT void JNICALL
Java_java_net_PlainSocketImpl_socketConnect(JNIEnv *env, jobject this,
jobject iaObj, jint port,
jint timeout)
{

if (timeout < 0 ) {
connect_rv = NET_Connect(fd, (struct sockaddr *)&him, len);
...
}
else {

#ifndef USE_SELECT
{
struct pollfd pfd;
pfd.fd = fd;
pfd.events = POLLOUT;

errno = 0;
connect_rv = NET_Poll(&pfd, 1, timeout);
}
#else
{
fd_set wr, ex;
struct timeval t;

t.tv_sec = timeout / 1000;
t.tv_usec = (timeout % 1000) * 1000;

FD_ZERO(&wr);
FD_SET(fd, &wr);
FD_ZERO(&ex);
FD_SET(fd, &ex);

errno = 0;
connect_rv = NET_Select(fd+1, 0, &wr, &ex, &t);
}
#endif

}

if (connect_rv == 0) {
JNU_ThrowByName(env, JNU_JAVANETPKG "SocketTimeoutException",
"connect timed out");

/*
* Timeout out but connection may still be established.
* At the high level it should be closed immediately but
* just in case we make the socket blocking again and
* shutdown input & output.
*/
SET_BLOCKING(fd);
JVM_SocketShutdown(fd, 2);
return;
}

/* has connection been established */
optlen = sizeof(connect_rv);
if (JVM_GetSockOpt(fd, SOL_SOCKET, SO_ERROR, (void*)&connect_rv,
&optlen) <0) {
connect_rv = errno;
}
}
}

原理 Read timed out

从下面这个时序图看, read timedout的原理就是通过系统调用 poll, 传入对应的socket文件句柄,在timeout时间内没有数据返回

当调用NET_Timeout没返回任何数据的时候, 根据情况会抛出 SocketTimeoutException或者SokcetException, 这个SocketTimeoutException就是我们经常遇到的read timed out

if (timeout) {
    nread = NET_Timeout(fd, timeout);
    if (nread <= 0) {
        if (nread == 0) {
            JNU_ThrowByName(env, JNU_JAVANETPKG "SocketTimeoutException",
                        "Read timed out");
        } else if (nread == JVM_IO_ERR) {
            if (errno == EBADF) {
                 JNU_ThrowByName(env, JNU_JAVANETPKG "SocketException", "Socket closed");
             } else {
                 NET_ThrowByNameWithLastError(env, JNU_JAVANETPKG "SocketException",
                                              "select/poll failed");
             }
        } else if (nread == JVM_IO_INTR) {
            JNU_ThrowByName(env, JNU_JAVAIOPKG "InterruptedIOException",
                        "Operation interrupted");
        }
        if (bufP != BUF) {
            free(bufP);
        }
        return -1;
    }
}

总结

  1. “connect timed out” 是在指定时间内TCP连接未创建成功时jdk抛出的异常
  2. “Read timed out”是在调用socketread后,指定时间内未收到响应时 jdk抛出的异常, 假如一个http响应10k, 每次socket read 4k, 那么就需要发起3次read的请求,假如timeout设置3秒,那么就允许每次read都等待3秒,最差的情况就是大概6秒读完数据,当然这得是极端的网络情况, 所以大部分情况下都是客户端发起请求后,在指定时间内收到的服务器的回包响应。
    ##

浅谈web中的gzip压缩

发表于 2019-07-06 |

背景

线上希望通过接入提高B国家用户的访问体验,所以在B国家新增了一个谷歌云服务的接入点

翻墙中

在测试中发现,转发的延迟达到了680ms,远远的超过了134ms(假如连接不复用情况下,那么2rtt也只是268ms),经过排查,发现响应体约90K,tcp响应得分开90多个包传输,由于tcp各种问题,所以总时间拖长了(后续再总结)

但是

  • A国家数据中心请求 是能够正常 压缩,相同的数据压缩后只有8KB
  • B国家数据中心请求 压缩异常

问题排查

排查Nginx

1
2
3
4
5
6
gzip             on;
gzip_comp_level 6;
gzip_min_length 1k;
gzip_buffers 4 8k;
gzip_disable "MSIE [1-6]\.(?!.*SV1)";
gzip_types text/plain application/x-javascript text/css application/xml text/javascript application/javascript application/json;

通过抓包对比两个数据中心的请求

发现谷歌SLB会在代理的请求增加以下Header标明是http的

Via: 1.1 google

通过查阅nginx配置,发现有个可疑的配置

gzip_proxied: nginx默认是不会对于来自代理服务器的请求就行压缩的,原因可参考what are the options for the gzip proxied for,简而言之

  1. 客户端支持的压缩协议不同,假如把响应gzip放在代理服务器上,代理服务器还是得解压了再按客户端支持的协议重新下发,或者客户端不支持或者不期望压缩。
  2. 对于某些内容,得基于未压缩的文件进行处理,例如视频的播放或者断点下载,客户端发起range请求,服务端依然得基于未压缩的内容进行处理。

所以Nginx对于有via头的,默认则不压缩是合理的

对于该情况,由于对外的都是api接口,不存在cache的情况,所以添加以下配置就解决了

1
gzip_proxied: any

web到处充斥着压缩,那么nginx是怎么判断什么时候需要处理的?tomcat呢? 各个工具间是怎么保证不产生冲突的。

先总结

  1. nginx提供了一系列的gzip_前缀的配置控制是否压缩,tomcat由于角色是web容器,所以提供的选项只有3个,连compress level都不提供。
  2. 在配置启用压缩的前提下, 还会检查 Content-Encoding是否存在gzip值,对于nginx会更加的详细,会判断多额外的边界条件,例如gzip, q=0也禁用。 从这点上看,nginx+tomcat的这种主流架构,尽管同时启用了gzip,都不会产生冲突。
  3. http针对压缩有accept-encoding(针对请求)以及Content-Encoding(针对响应),所以服务器间压缩前判断是否Content-Encoding已经标明该内容以及压缩了,则不进行重复压缩。

源码解析

nginx源码

ngx_http_gzip_filter_module.c

1
2
3
4
5
6
7
8
9
10
11
12
13
14
15
16
17
18
19
20
21
22
23
24
25
26
27
28
29
30
31
32
33
34
35
36
37
38
39
40
41
42
static ngx_int_t
ngx_http_gzip_header_filter(ngx_http_request_t *r)
{
ngx_table_elt_t *h;
ngx_http_gzip_ctx_t *ctx;
ngx_http_gzip_conf_t *conf;

conf = ngx_http_get_module_loc_conf(r, ngx_http_gzip_filter_module);

// 以下是不进行zip的条件
// 没配置gzip: one
if (!conf->enable
//gzip 状态错误
|| (r->headers_out.status != NGX_HTTP_OK
&& r->headers_out.status != NGX_HTTP_FORBIDDEN
&& r->headers_out.status != NGX_HTTP_NOT_FOUND)
// Content-Encoding header不为空,
|| (r->headers_out.content_encoding
&& r->headers_out.content_encoding->value.len)
//响应体的大小小于设置的的最小长度 gzip_min_length
|| (r->headers_out.content_length_n != -1
&& r->headers_out.content_length_n < conf->min_length)
//Content-Type不在配置gzip_types范围内
|| ngx_http_test_content_type(r, &conf->types) == NULL
//没响应体
|| r->header_only)
{
return ngx_http_next_header_filter(r);
}

r->gzip_vary = 1;

if (!r->gzip_tested) {
//下面说明
if (ngx_http_gzip_ok(r) != NGX_OK) {
return ngx_http_next_header_filter(r);
}
//当gzip_tested为true时表示已经判断过是否支持gzip, gzip_ok则为判断的结果
} else if (!r->gzip_ok) {
return ngx_http_next_header_filter(r);
}
}

ngx_http_core_module

1
2
3
4
5
6
7
8
9
10
11
12
13
14
15
16
17
18
19
20
21
22
23
24
25
26
27
28
29
30
31
32
33
34
35
36
37
38
39
40
41
42
43
44
45
46
47
48
49
50
51
52
53
54
55
56
57
58
59
60
61
62
63
64
65
66
67
68
69
70
71
72
73
74
75
76
77
78
79
80
81
82
83
84
85
86
87
88
89
90
91
92
93
94
95
96
97
98
99
100
101
102
103
104
105
106
107
108
109
110
111
112
113
114
115
116
117
118
119
120
121
122
123
124
125
126
127
128
129
130
131
132
133
134
135
136
137
138
139
140
141
142
143
144
145
146
147
148
149
150
151
152
153
154
155
156

ngx_int_t
ngx_http_gzip_ok(ngx_http_request_t *r)
{
time_t date, expires;
ngx_uint_t p;
ngx_array_t *cc;
ngx_table_elt_t *e, *d, *ae;
ngx_http_core_loc_conf_t *clcf;

r->gzip_tested = 1;

//是否是nginx子请求,可参考nginx batch api
if (r != r->main) {
return NGX_DECLINED;
}

//客户端没传 Accept-Encoding
ae = r->headers_in.accept_encoding;
if (ae == NULL) {
return NGX_DECLINED;
}

if (ae->value.len < sizeof("gzip") - 1) {
return NGX_DECLINED;
}

/*
* test first for the most common case "gzip,...":
* MSIE: "gzip, deflate"
* Firefox: "gzip,deflate"
* Chrome: "gzip,deflate,sdch"
* Safari: "gzip, deflate"
* Opera: "gzip, deflate"
*/

//Accept-Encoding 不包含合法gzip
if (ngx_memcmp(ae->value.data, "gzip,", 5) != 0
&& ngx_http_gzip_accept_encoding(&ae->value) != NGX_OK)
{
return NGX_DECLINED;
}

clcf = ngx_http_get_module_loc_conf(r, ngx_http_core_module);

//是否旧的不兼容的UA
if (r->headers_in.msie6 && clcf->gzip_disable_msie6) {
return NGX_DECLINED;
}

if (r->http_version < clcf->gzip_http_version) {
return NGX_DECLINED;
}

if (r->headers_in.via == NULL) {
goto ok;
}

p = clcf->gzip_proxied;

//gzip_proxied: off //默认情况
if (p & NGX_HTTP_GZIP_PROXIED_OFF) {
return NGX_DECLINED;
}

//gzip_proxied: any
if (p & NGX_HTTP_GZIP_PROXIED_ANY) {
goto ok;
}

//gzip_proxied: auth
if (r->headers_in.authorization && (p & NGX_HTTP_GZIP_PROXIED_AUTH)) {
goto ok;
}

e = r->headers_out.expires;

if (e) {

//对应 enables compression if a response header includes the “Expires” field with a value that disables caching;
if (!(p & NGX_HTTP_GZIP_PROXIED_EXPIRED)) {
return NGX_DECLINED;
}

expires = ngx_parse_http_time(e->value.data, e->value.len);
if (expires == NGX_ERROR) {
return NGX_DECLINED;
}

d = r->headers_out.date;

if (d) {
date = ngx_parse_http_time(d->value.data, d->value.len);
if (date == NGX_ERROR) {
return NGX_DECLINED;
}

} else {
date = ngx_time();
}

if (expires < date) {
goto ok;
}

return NGX_DECLINED;
}

cc = &r->headers_out.cache_control;

//gzip_proxied: no-cache/no-store/private等各种情况
if (cc->elts) {

if ((p & NGX_HTTP_GZIP_PROXIED_NO_CACHE)
&& ngx_http_parse_multi_header_lines(cc, &ngx_http_gzip_no_cache,
NULL)
>= 0)
{
goto ok;
}

if ((p & NGX_HTTP_GZIP_PROXIED_NO_STORE)
&& ngx_http_parse_multi_header_lines(cc, &ngx_http_gzip_no_store,
NULL)
>= 0)
{
goto ok;
}

if ((p & NGX_HTTP_GZIP_PROXIED_PRIVATE)
&& ngx_http_parse_multi_header_lines(cc, &ngx_http_gzip_private,
NULL)
>= 0)
{
goto ok;
}

return NGX_DECLINED;
}

//no_last_modified
if ((p & NGX_HTTP_GZIP_PROXIED_NO_LM) && r->headers_out.last_modified) {
return NGX_DECLINED;
}

//no_etag
if ((p & NGX_HTTP_GZIP_PROXIED_NO_ETAG) && r->headers_out.etag) {
return NGX_DECLINED;
}

ok:

r->gzip_ok = 1;

return NGX_OK;
}

Tomcat源码

tomcat针对压缩,可配置的选项相对较少
  • compressibleMimeType
  • compression
  • compressionMinSize
    基本就是允许什么content-type的进行压缩,启用压缩的大小是多少

org.apache.coyote.http11.Http11Processor

以http1.1协议为例,主要逻辑为,以下只说明压缩后会改变了什么http的头部

1
2
3
4
5
6
7
8
9
10
11
12
13
14
15
16
17
18
19
20
21
if (useCompression) {
outputBuffer.addActiveFilter(outputFilters[Constants.GZIP_FILTER]);

//设置了Content-Encoding
headers.setValue("Content-Encoding").setString("gzip");
}
// If it might be compressed, set the Vary header
if (isCompressible) {
// Make Proxies happy via Vary (from mod_deflate)
MessageBytes vary = headers.getValue("Vary");
if (vary == null) {
// Add a new Vary header
headers.setValue("Vary").setString("Accept-Encoding");
} else if (vary.equals("*")) {
// No action required
} else {
// Merge into current header
headers.setValue("Vary").setString(
vary.getString() + ",Accept-Encoding");
}
}

Tcp - 从jedis看常用的tcp参数

发表于 2018-05-17 |

背景

由于微服务的兴起,以及公司内部各种服务间的各种调用,最近也遇过几次线上大量TIME_WAIT的问题,虽然知道怎么解决,但也点燃了我对tcp协议重新温习学习的兴趣。

从何学习呢?重新看下几百多页的《TCP/IP详解》,那太花时间了,以前页看过一次。不如从一些优秀的开源项目里,看下他们是怎么使用tcp建立连接的?那就从jedis开始吧。😃

源码分析步骤

下载源代码

1
2
git clone https://github.com/xetorthio/jedis.git
git checkout tags/jedis-2.9.0

分析

从最简单的jedis.set追到底层的tcp网络编程吧

时序图

核心tcp参数设置

1
2
3
4
5
6
7
8

socket.setReuseAddress(true);
socket.setKeepAlive(true); // Will monitor the TCP connection is
// valid
socket.setTcpNoDelay(true); // Socket buffer Whetherclosed, to
// ensure timely delivery of data
socket.setSoLinger(true, 0); // Control calls close () method
socket.setSoTimeout(soTimeout);
1 setReuseAddress

可以看出setReuseAddress本质上就是对SO_REUSEADDR的设置

1
2
3
4
5
6

public void setReuseAddress(boolean on) throws SocketException {
if (isClosed())
throw new SocketException("Socket is closed");
getImpl().setOption(SocketOptions.SO_REUSEADDR, Boolean.valueOf(on));
}

SO_REUSEADDR主要的作用(其它作用)就是对TIME_WAIT连接的重用,对于jedis,作者应该是希望客户端重启后,重新创建到redis服务器的tcp连接能够重用之前的接口。因为客户端重启时,活跃的jedis连接由于时客户端主动关闭,会持续2*MSL的TIME_WAIT状态,在此期间会一直占用着客户端端口。
MSL的大小可通过以下命令查看

1
2
sysctl -a | grep tcp_fin_timeout
tcp_fin_timeout = 60
2 setKeepAlive

SO_KEEPALIVE是tcp利用心跳机制保持连接的存活,假如连接已经断开,则会响应错误码Broken Pipe给上层应用,由于keepalive发起心跳包的开始实际比较迟,对于调整后的linux操作系统仍然需要5分钟,数值过小又会导致过多无用的包发出,5分钟的时间长度发出后,通常也会由于各种各样的原因连接早已被销毁,例如客户端服务器端的连接经过了lvs,haproxy各种各样的代理,代理服务器本身也会有个keepalive的最长时间。
一般业务对于SO_KEEPALIVE的依赖比较小,假如需要保持连接的话,会自己进行一些存活性的维持和判断,例如

  1. 定期小周期发送心跳包keep alive
  2. 在使用连接前进行判断,例如连接池通常采用的testOnBorrow, testOnReturn之类的机制。
1
2
3
4
sudo sysctl -a | grep tcp_keepalive   
net.ipv4.tcp_keepalive_intvl = 75
net.ipv4.tcp_keepalive_probes = 9
net.ipv4.tcp_keepalive_time = 300 //通常默认值为7200
3 setTcpNoDelay

TCP_NODELAY的作用就是禁用Nagle,减少由于小包带来的推迟发送的延迟

If set, disable the Nagle algorithm. This means that segments are always sent as soon as possible,
even if there is only a small amount of data. When not set, data is buffered until there is a suffi‐
cient amount to send out, thereby avoiding the frequent sending of small packets, which results in poor
utilization of the network. This option is overridden by TCP_CORK; however, setting this option forces
an explicit flush of pending output, even if TCP_CORK is currently set.

4 setSoLinger(true, 0)

这个选项的设置就是jedis关闭的时候直接发送RST,而不是按照正常的4次挥手的关闭流程,避免了客户端TIME_WAIT的情况,但不是一个很好的pratice,因为服务端会只会收到RST,这里留下一个问题,redis是如何处理rst的,是否是直接忽略,不然就会堆积很多错误日志?

5 socket.setSoTimeout(soTimeout)

SO_TIMEOUT的作用就是设置以下三个socket操作的超时时间,很明显,ServerSocket.accept()是针对服务端而言,DatagramSocket.receive()是针对UDP,在这里jedis生效的是SocketInputStream.read(),作用就是jedis发送命令后,开始读redis请求的响应时间。

1
2
3
4

ServerSocket.accept();
SocketInputStream.read();
DatagramSocket.receive();

总结

tcp是一个非常复杂的网络协议,但对于“客户端”的tcp编程其实也不是特别难,从jedis在tcp的使用上看,直接用了blocking io,同时设置了5个参数,就满足了大部分场合的使用,对于一般互联网的服务,也只是使用多一个池化JedisPool而已。

无处不在的常量池

发表于 2018-05-03 |

引言

在看redis源码的过程中,看到了redis为了高效使用内存,内部维护了个Integer常量池,使得redis对于频繁出现的Integer,能够减少内存的使用,也减少了内存申请和释放的开销,所以把各种场景的常量池做次归纳。

各种常量池

Java常量池

JVM字符串常量池

这个太多常见了,直接google即可

Integer常量池

对于Intger常量池,可以看下面这个例子,a和b变量都是引用类型,但进行“==”判断是否是同个引用的时候返回有时会返回true,这个是什么原因呢?因为JVM内部自己维护了个常量池,a和b都是指向了相同的“常量”实例,所以”==”会返回true, 而cd的值超出了默认常量值的范围,所以“==”返回false.

1
2
3
4
5
6
7
8
9
10
public static void main(String[] args) throws Exception {

Integer a = 1;
Integer b = 1;
System.out.println(a == b); //true

Integer c = 128;
Integer d = 128;
System.out.println(c == d); //false,默认情况,假如修改了jvm参数设置常量池大小,那么该结果有可能为true
}

那在jdk里面是如何使用到这个常量池的?
源码,从Integer.valueOf()方法中可以看出这里是使用了cache,也就是Integer常量值,对于 Integer a = 1这种statement, jvm其实也就是调用了valueOf方法进行boxing. IntegerCache.high是可以通过设置jvm参数进行改变。

1
2
3
4
5
public static Integer valueOf(int i) {
if (i >= IntegerCache.low && i <= IntegerCache.high)
return IntegerCache.cache[i + (-IntegerCache.low)];
return new Integer(i);
}

所以以下这种坏味道的代码,也不会造成明显的性能影响

1
2
3
4
for (Integer i = 0; i < 10; i++){
//通常会有很多言论说这种代码会创建额外的Integer对象,但其实不然,因为
//jvm已经在背后做了优化
}

Redis 常量池

通常会遇到redis的一种使用场景,只是想通过设置某个key,然后通过判断某个key是否存在,value的值没任何意义,这个时候就会纠结value应该取什么值比较省内存,如果通过redis-rdb-tools进行内存计算,可以得出以下结果,空字符串的value内存占用比保存’1’占用了多8个字节的长度,这是因为对于’’需要保存一个空字符串,而对于’1’,则命中了redis整形常量池,无需而外分配内存保存’1’,整个数据存储的占用等另开一篇文章说明。

1
2
set k '' #总共占用56字节
set k 1 #总共占用48字节

Redis在编码字符串是会尝试进行一些压缩编码,以下代码就是redis使用整形常量池的片段

常量池初始化

1
2
3
4
5
for (j = 0; j < OBJ_SHARED_INTEGERS; j++) {
shared.integers[j] =
makeObjectShared(createObject(OBJ_STRING,(void*)(long)j));
shared.integers[j]->encoding = OBJ_ENCODING_INT;
}

常量池使用

1
2
3
4
5
6
7
8
9
10
11
12
13
14
15
16
17
18
19
20
if (len <= 20 && string2l(s,len,&value)) {
/* This object is encodable as a long. Try to use a shared object.
* Note that we avoid using shared integers when maxmemory is used
* because every object needs to have a private LRU field for the LRU
* algorithm to work well. */
if ((server.maxmemory == 0 ||
!(server.maxmemory_policy & MAXMEMORY_FLAG_NO_SHARED_INTEGERS)) &&
value >= 0 &&
value < OBJ_SHARED_INTEGERS)//redis会初始化 0至OBJ_SHARED_INTEGERS的常量,
{
decrRefCount(o);
incrRefCount(shared.integers[value]);
return shared.integers[value];
} else {
if (o->encoding == OBJ_ENCODING_RAW) sdsfree(o->ptr);
o->encoding = OBJ_ENCODING_INT;
o->ptr = (void*) value;
return o;
}
}

Spring - Rabbitmq bug排查

发表于 2018-04-24 |

背景

项目同时连接多个rabbitmq,使用spring-rabbit进行连接,版本号为1.4.6.RELEASE

某天发现rabbitmq服务器日志错误日志出现大量

Channel error on connection <0.3019.46> (1.1.1.1:41724 -> 1.2.3.4:5672, vhost: ‘/‘, user: ‘xunhuan_prod’), channel 31: operation queue.declare caused a channel exception not_found: “no queue ‘wolfkill.groups.online.time.queue’ in vhost ‘/‘“

rabbitmq架构

两个rabbitmq集群,使用不同的virtual host

集群 Virtual Host Queue
A service_A A1, A2
B / wolfkill.groups.online.time.queue

故障排查

检查spring xml配置文件

  • 两个rabbitmq配置都已经分开
  • queue和exchange都全部加上了declared-by

检查源代码

SimpleMessageListenerContainer

初始化的时候判断当前RabbitAdmin的数量,假如不为空的话,就赋值给成员变量RabbitAdmin,看到这里时已经感觉有点不妥,这也太过随意了吧😮,该项目接入了两个mq,所以RabbitAdmin对应着有两个。
源代码传送门

1
2
3
4
5
6
7
8
9
10
@Override
protected void doStart() throws Exception {
super.doStart();
if (this.rabbitAdmin == null && this.getApplicationContext() != null) {
//初始化时会随机拿第一个RabbitAdmin设置为当前的变量以供后续使用,但当项目有多个RabbitAdmin时则可能设置错误
Map<String, RabbitAdmin> admins = this.getApplicationContext().getBeansOfType(RabbitAdmin.class);
if (!admins.isEmpty()) {
this.rabbitAdmin = admins.values().iterator().next();
}
}

在doStart之后执行的代码,拿了不确定的RabbitAdmin继续declare Queue(调用Rabbitmq Broker api).
源代码传送门

1
2
3
4
5
6
7
8
9
10
11
12
13
14
15
16
17
18
19
20
21
private synchronized void redeclareElementsIfNecessary() {
try {
ApplicationContext applicationContext = this.getApplicationContext();
if (applicationContext != null) {
Set<String> queueNames = this.getQueueNamesAsSet();
Map<String, Queue> queueBeans = applicationContext.getBeansOfType(Queue.class);
for (Entry<String, Queue> entry : queueBeans.entrySet()) {
Queue queue = entry.getValue();
//rabbitAdmin.getQueueProperties会调用channel.queueDeclarePassive,所以这个时候会拿了错误的RabbitAdmin进行创建,所以该处是问题所在
if (queueNames.contains(queue.getName()) &&
this.rabbitAdmin.getQueueProperties(queue.getName()) == null) {
if (logger.isDebugEnabled()) {
logger.debug("At least one queue is missing: " + queue.getName()
+ "; redeclaring context exchanges, queues, bindings.");
}
this.rabbitAdmin.initialize();
return;
}
}
}
}

检查新版本代码

源代码传送门

检查最新的版本1.7.3.RELEASE, 最新版本已经加了条件判断,当只有一个RabbitAdmin时才会设置。

1
2
3
4
5
6
7
@Override
protected void doStart() throws Exception {
if (this.rabbitAdmin == null && this.getApplicationContext() != null) {
Map<String, RabbitAdmin> admins = this.getApplicationContext().getBeansOfType(RabbitAdmin.class);
if (admins.size() == 1) {
this.rabbitAdmin = admins.values().iterator().next();
}

所以该问题的原因是spring rabbitmq在项目同时存在多个RabbitAdmin时,误用了RabbitAdmin, RabbitAdmin就是分别对应着不同的Rabbitmq集群,在该场景下,用了RabbitAdmin A去创建原本应该创建在B上的Virtual Host为“/”的Queue”wolfkill.groups.online.time.queue”.

总结

  1. 该问题是spring-rabbitmq模块的bug,搞版本已经解决
  2. 使用开源工具时,尽可能的使用最新的版本。

spring-data-mongo源码解析

发表于 2018-04-04 |

背景

由于项目已经很重的使用了mongodb, 对于mongodb的访问主要采用spring-data-mongo,该框架对于一些简单的查询语句都能直接通过Query methods,需要手工写查询语句的情况也很少,这种magic般的使用方法也引起了我的好奇,以前写查询语句的时候规范也是说,对于进行sql查询的方法应当和查询的条件保持一致,例如findByXXX之类,没想到spring data只需要按照类似这种规范,就能直接生成对应的查询语句,那么底层是怎么实现的?

源码分析

目的

了解spring接口类方法的原理。

准备工作

通过spring boot快速搭建demo,该demo包含一个MongoRepository,通过main函数执行一些简单的查询方法。

ArticleRepositroy

1
2
3
4
5
6
7
8
9
10
/**
* 无需任何实现,使用findByAuthor时,spring data会自动生成mongodb查询语句
**/
public interface ArticleRepository extends MongoRepository<Article, String>,
CustomizedArticleRepository {

List<Article> findByAuthorOrderByIdDescAllIgnoreCase(String author);

List<Article> findByNumOfLikeIsGreaterThan(int numOfLike);
}

源码分析

Spring Boot配置

要了解spring data mongo原理,最直接的方法就是看repository是怎么初始化的,由于该demo是基于spring boot,按照spring boot的特点,初始化的控制都是由各种AutoConfiguration引导。

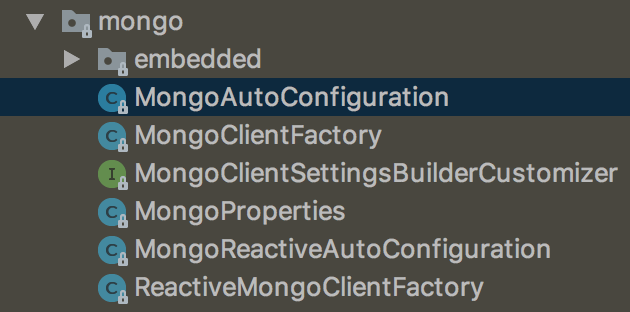
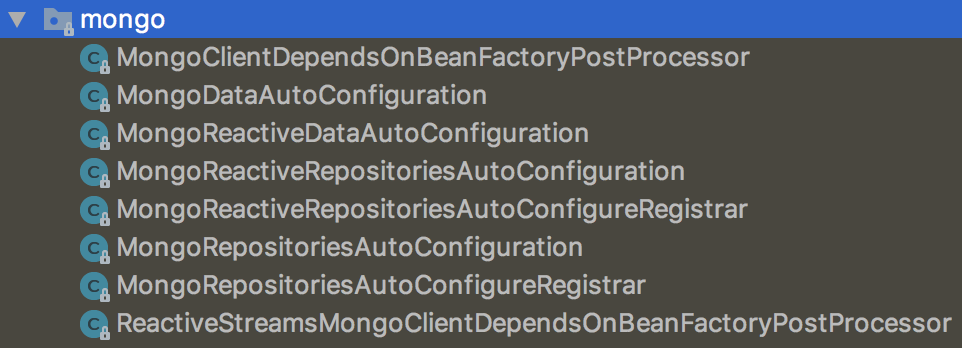
直接在IDE里搜索 *Mongo*AutoConfiguration, 可以发现以下配置类

相关配置类

  • org.springframework.boot.autoconfigure.mongo,MongoClient,MongoTemplate相关配置
  • org.springframework.boot.autoconfigure.data.mongo,data mongo相关配置,涉及到核心类Repository

spring data mongo主要是由这两个package下的配置类初始化,对于Repository类的初始化,核心类是
MongoRepositoriesAutoConfigureRegistrar

1
2
3
4
5
6
7
8
9
10
11
12
13
14
15
16
17
18
19
20
21
22
class MongoRepositoriesAutoConfigureRegistrar
extends AbstractRepositoryConfigurationSourceSupport {

@Override
protected Class<? extends Annotation> getAnnotation() {
return EnableMongoRepositories.class;
}

@Override
protected Class<?> getConfiguration() {
return EnableMongoRepositoriesConfiguration.class;
}

@Override
protected RepositoryConfigurationExtension getRepositoryConfigurationExtension() {
return new MongoRepositoryConfigurationExtension();
}

@EnableMongoRepositories
private static class EnableMongoRepositoriesConfiguration {
}
}

该类继承了AbstractRepositoryConfigurationSourceSupport并且实现了三个抽象方法,查看了AbstractRepositoryConfigurationSourceSupport的子类,可以发现spring data很多模块都是继承该类,所以AbstractRepositoryConfigurationSourceSupport是Spring data初始化的核心

  • AbstractRepositoryConfigurationSourceSupport
    • CassandraRepositoriesAutoConfigureRegistrar
    • MongoRepositoriesAutoConfigureRegistrar
    • ElasticsearchRepositoriesRegistrar
    • LdapRepositoriesRegistrar
    • CassandraReactiveRepositoriesAutoConfigureRegistrar
    • CouchbaseRepositoriesRegistrar
    • JpaRepositoriesAutoConfigureRegistrar
    • CouchbaseReactiveRepositoriesRegistrar
    • RedisRepositoriesAutoConfigureRegistrar
    • Neo4jRepositoriesAutoConfigureRegistrar
    • SolrRepositoriesRegistrar
    • MongoReactiveRepositoriesAutoConfigureRegistrar

MongoRepositoriesAutoConfigureRegistrar

该类实现的三个方法都是返回了配置类POJO,这里主要有两个对象

  1. EnableMongoRepositories 配置类,方法getRepositoryFactoryBeanClassName返回MongoRepositoryFactoryBean,该工厂bean返回了Repositoryd的代理
  2. RepositoryConfigurationExtension 该类主要是在Spring Data通用的bean初始化阶段加入mongodb特有的一些配置,其大部分方法都是接受了BeanDefinitionBuilder进行一些
EnableMongoRepositories

1
2
3
4
5
6
7
8
9
10
11
12
13
14
15
16
17
18
19
20
21
22
23
24
25
26
27
28
29
30
31
32
33
34
35
36
37
38
39
40
41
42
43
44
45
46
47
48
49
50
51
52
53
54
55
56
57
58
59
60
61
62
63
64
65
66
67
68
69
70
71
72
73
74
75
76
77
78
79
80
81
82
83
84
85
86
87
88
89
90
91
92
93
public @interface EnableMongoRepositories {

/**
* Alias for the {@link #basePackages()} attribute. Allows for more concise annotation declarations e.g.:
* {@code @EnableMongoRepositories("org.my.pkg")} instead of {@code @EnableMongoRepositories(basePackages="org.my.pkg")}.
*/
String[] value() default {};

/**
* Base packages to scan for annotated components. {@link #value()} is an alias for (and mutually exclusive with) this
* attribute. Use {@link #basePackageClasses()} for a type-safe alternative to String-based package names.
*/
String[] basePackages() default {};

/**
* Type-safe alternative to {@link #basePackages()} for specifying the packages to scan for annotated components. The
* package of each class specified will be scanned. Consider creating a special no-op marker class or interface in
* each package that serves no purpose other than being referenced by this attribute.
*/
Class<?>[] basePackageClasses() default {};

/**
* Specifies which types are eligible for component scanning. Further narrows the set of candidate components from
* everything in {@link #basePackages()} to everything in the base packages that matches the given filter or filters.
*/
Filter[] includeFilters() default {};

/**
* Specifies which types are not eligible for component scanning.
*/
Filter[] excludeFilters() default {};

/**
* Returns the postfix to be used when looking up custom repository implementations. Defaults to {@literal Impl}. So
* for a repository named {@code PersonRepository} the corresponding implementation class will be looked up scanning
* for {@code PersonRepositoryImpl}.
*
* @return
*/
String repositoryImplementationPostfix() default "Impl";

/**
* Configures the location of where to find the Spring Data named queries properties file. Will default to
* {@code META-INFO/mongo-named-queries.properties}.
*
* @return
*/
String namedQueriesLocation() default "";

/**
* Returns the key of the {@link QueryLookupStrategy} to be used for lookup queries for query methods. Defaults to
* {@link Key#CREATE_IF_NOT_FOUND}.
*
* @return
*/
Key queryLookupStrategy() default Key.CREATE_IF_NOT_FOUND;

/**
* Returns the {@link FactoryBean} class to be used for each repository instance. Defaults to
* {@link MongoRepositoryFactoryBean}.
*
* @return
*/
Class<?> repositoryFactoryBeanClass() default MongoRepositoryFactoryBean.class;

/**
* Configure the repository base class to be used to create repository proxies for this particular configuration.
*
* @return
* @since 1.8
*/
Class<?> repositoryBaseClass() default DefaultRepositoryBaseClass.class;

/**
* Configures the name of the {@link MongoTemplate} bean to be used with the repositories detected.
*
* @return
*/
String mongoTemplateRef() default "mongoTemplate";

/**
* Whether to automatically create indexes for query methods defined in the repository interface.
*
* @return
*/
boolean createIndexesForQueryMethods() default false;

/**
* Configures whether nested repository-interfaces (e.g. defined as inner classes) should be discovered by the
* repositories infrastructure.
*/
boolean considerNestedRepositories() default false;
}


EnableMongoRepositoriesConfiguration

1
2
3
4
@EnableMongoRepositories
private static class EnableMongoRepositoriesConfiguration {

}


RepositoryConfigurationExtension

1
2
3
4
5
6
7
8
9
10
11
12
13
14
15
16
17
18
19
20
21
22
23
24
25
26
27
28
29
30
31
32
33
34
35
36
37
38
39
40
41
42
43
44
45
46
47
48
49
50
51
52
53
54
55
56
57
58
59
60
61
62
63
64
65
66
67
68
69
70
71
72
73
74
75
76
77
78
79
80
81
82
83
84
public interface RepositoryConfigurationExtension {

/**
* Returns the descriptive name of the module.
*
* @return
*/
String getModuleName();

/**
* Returns all {@link RepositoryConfiguration}s obtained through the given {@link RepositoryConfigurationSource}.
*
* @param configSource must not be {@literal null}.
* @param loader must not be {@literal null}.
* @deprecated call or implement
* {@link #getRepositoryConfigurations(RepositoryConfigurationSource, ResourceLoader, boolean)} instead.
* @return
*/
@Deprecated
<T extends RepositoryConfigurationSource> Collection<RepositoryConfiguration<T>> getRepositoryConfigurations(
T configSource, ResourceLoader loader);

/**
* Returns all {@link RepositoryConfiguration}s obtained through the given {@link RepositoryConfigurationSource}.
*
* @param configSource
* @param loader
* @param strictMatchesOnly whether to return strict repository matches only. Handing in {@literal true} will cause
* the repository interfaces and domain types handled to be checked whether they are managed by the current
* store.
* @return
* @since 1.9
*/
<T extends RepositoryConfigurationSource> Collection<RepositoryConfiguration<T>> getRepositoryConfigurations(
T configSource, ResourceLoader loader, boolean strictMatchesOnly);

/**
* Returns the default location of the Spring Data named queries.
*
* @return must not be {@literal null} or empty.
*/
String getDefaultNamedQueryLocation();

/**
* Returns the name of the repository factory class to be used.
*
* @return
*/
String getRepositoryFactoryBeanClassName();

/**
* Callback to register additional bean definitions for a {@literal repositories} root node. This usually includes
* beans you have to set up once independently of the number of repositories to be created. Will be called before any
* repositories bean definitions have been registered.
*
* @param registry
* @param source
*/
void registerBeansForRoot(BeanDefinitionRegistry registry, RepositoryConfigurationSource configurationSource);

/**
* Callback to post process the {@link BeanDefinition} and tweak the configuration if necessary.
*
* @param builder will never be {@literal null}.
* @param config will never be {@literal null}.
*/
void postProcess(BeanDefinitionBuilder builder, RepositoryConfigurationSource config);

/**
* Callback to post process the {@link BeanDefinition} built from annotations and tweak the configuration if
* necessary.
*
* @param builder will never be {@literal null}.
* @param config will never be {@literal null}.
*/
void postProcess(BeanDefinitionBuilder builder, AnnotationRepositoryConfigurationSource config);

/**
* Callback to post process the {@link BeanDefinition} built from XML and tweak the configuration if necessary.
*
* @param builder will never be {@literal null}.
* @param config will never be {@literal null}.
*/
void postProcess(BeanDefinitionBuilder builder, XmlRepositoryConfigurationSource config);


初始化流程

入口

MongoRepositoriesAutoConfigureRegistrar的父类AbstractRepositoryConfigurationSourceSupport
AbstractRepositoryConfigurationSourceSupport,该类主要实现了ImportBeanDefinitionRegistrar的registerBeanDefinitions方法,registerBeanDefinitions是Spring初始化的时候调用,让程序能够自主注册一些bean到spring容器里

1
2
3
4
5
6
7
@Override
public void registerBeanDefinitions(AnnotationMetadata importingClassMetadata,
BeanDefinitionRegistry registry) {
new RepositoryConfigurationDelegate(getConfigurationSource(registry),
this.resourceLoader, this.environment).registerRepositoriesIn(registry,
getRepositoryConfigurationExtension());
}

流程

registerBeanDefinitions. registerBeanDefinitions调用了RepositoryConfigurationDelegate.registerRepositoriesIn方法
这个方法包含了spring data mongo对于mongo repository的初始化的整个流程,主要逻辑是通过configurationSource(由EnableMongoRepositories构造),以及RepositoryConfigurationExtension扫描BasePackages下面的类,构造beanDefinition并且注册到spring registry。

1
2
3
4
5
6
7
8
9
10
11
12
13
14
15
16
17
18
19
20
21
22
23
24
25
26
27
28
29
30
31
32
33
34
35
36
37
38
39
40
41
42
43
44
45
46
/**
* Registers the found repositories in the given {@link BeanDefinitionRegistry}.
*
* @param registry
* @param extension
* @return {@link BeanComponentDefinition}s for all repository bean definitions found.
*/
public List<BeanComponentDefinition> registerRepositoriesIn(BeanDefinitionRegistry registry,
RepositoryConfigurationExtension extension) {

extension.registerBeansForRoot(registry, configurationSource);

RepositoryBeanDefinitionBuilder builder = new RepositoryBeanDefinitionBuilder(registry, extension, resourceLoader,
environment);
List<BeanComponentDefinition> definitions = new ArrayList<>();

for (RepositoryConfiguration<? extends RepositoryConfigurationSource> configuration : extension
.getRepositoryConfigurations(configurationSource, resourceLoader, inMultiStoreMode)) {

//BeanDefintion构造的主要逻辑
BeanDefinitionBuilder definitionBuilder = builder.build(configuration);

extension.postProcess(definitionBuilder, configurationSource);

if (isXml) {
extension.postProcess(definitionBuilder, (XmlRepositoryConfigurationSource) configurationSource);
} else {
extension.postProcess(definitionBuilder, (AnnotationRepositoryConfigurationSource) configurationSource);
}

AbstractBeanDefinition beanDefinition = definitionBuilder.getBeanDefinition();
String beanName = configurationSource.generateBeanName(beanDefinition);

if (LOGGER.isDebugEnabled()) {
LOGGER.debug(REPOSITORY_REGISTRATION, extension.getModuleName(), beanName,
configuration.getRepositoryInterface(), configuration.getRepositoryFactoryBeanClassName());
}

beanDefinition.setAttribute(FACTORY_BEAN_OBJECT_TYPE, configuration.getRepositoryInterface());

registry.registerBeanDefinition(beanName, beanDefinition);
definitions.add(new BeanComponentDefinition(beanDefinition, beanName));
}

return definitions;
}

BeanDefinition构造

registerRepositoriesIn调用了RepositoryBeanDefinitionBuilder.build方法,注意到BeanDefinitionBuilder
.rootBeanDefinition(configuration.getRepositoryFactoryBeanClassName()),这里把MongoRepositoryFactoryBean设置为BeanDefinition的class,意味着Bean的初始化由MongoRepositoryFactoryBean进行控制

1
2
3
4
5
6
7
8
9
10
11
12
13
14
15
16
17
18
19
20
21
22
23
24
25
26
27
28
29
30
31
32
33
34
35
36
37
38
39
40
41
42
43
44
45
46
47
48
49
50
51
public BeanDefinitionBuilder build(RepositoryConfiguration<?> configuration) {

Assert.notNull(registry, "BeanDefinitionRegistry must not be null!");
Assert.notNull(resourceLoader, "ResourceLoader must not be null!");

//设置类为MongoRepositoryFactoryBean
BeanDefinitionBuilder builder = BeanDefinitionBuilder
.rootBeanDefinition(configuration.getRepositoryFactoryBeanClassName());

builder.getRawBeanDefinition().setSource(configuration.getSource());
builder.addConstructorArgValue(configuration.getRepositoryInterface());
builder.addPropertyValue("queryLookupStrategyKey", configuration.getQueryLookupStrategyKey());
builder.addPropertyValue("lazyInit", configuration.isLazyInit());

configuration.getRepositoryBaseClassName()//
.ifPresent(it -> builder.addPropertyValue("repositoryBaseClass", it));

NamedQueriesBeanDefinitionBuilder definitionBuilder = new NamedQueriesBeanDefinitionBuilder(
extension.getDefaultNamedQueryLocation());
configuration.getNamedQueriesLocation().ifPresent(definitionBuilder::setLocations);

builder.addPropertyValue("namedQueries", definitionBuilder.build(configuration.getSource()));

//2.0版本已经不建议使用的方法,和Framement类似
registerCustomImplementation(configuration).ifPresent(it -> {
builder.addPropertyReference("customImplementation", it);
builder.addDependsOn(it);
});

BeanDefinitionBuilder fragmentsBuilder = BeanDefinitionBuilder
.rootBeanDefinition(RepositoryFragmentsFactoryBean.class);

List<String> fragmentBeanNames = registerRepositoryFragmentsImplementation(configuration) //
.map(RepositoryFragmentConfiguration::getFragmentBeanName) //
.collect(Collectors.toList());

fragmentsBuilder.addConstructorArgValue(fragmentBeanNames);

//注册Fragmemnt,也就是这种做法
//https://docs.spring.io/spring-data/mongodb/docs/2.0.6.RELEASE/reference/html/#repositories.custom-implementations
builder.addPropertyValue("repositoryFragments",
ParsingUtils.getSourceBeanDefinition(fragmentsBuilder, configuration.getSource()));

RootBeanDefinition evaluationContextProviderDefinition = new RootBeanDefinition(
ExtensionAwareEvaluationContextProvider.class);
evaluationContextProviderDefinition.setSource(configuration.getSource());

builder.addPropertyValue("evaluationContextProvider", evaluationContextProviderDefinition);

return builder;
}

MongoRepositoryFactoryBean

MongoRepositoriesAutoConfigureRegistrar的职责最终就是把所有扫到的Repository构造成BeanDefinition注册到Registry, BeanDefinition的BaseClass是MongoRepositoryFactoryBean,所以该FactoryBean是spring data mongo的核心。

从该Sequence Diagram可以看出Repository最终的实现是通过Proxy,这里只列出了两个关键的Interceptor

  1. QueryExecutorMethodInterceptor - 该类主要实现了Query methods
  2. ImplementationMethodExecutionInterceptor - 该类主要实现了repositories.custom-implementations

Sequence Diagram

Class Diagram

QueryExecutorMethodInterceptor

从该Sequence Diagram可看出QueryExecutorMethodInterceptor最终构造了PartTree,PartTree又Predicate组成

Sequence Diagram

Class Diagram

PartTree

PartTree首先通过方法名(source参数)解析出语句类型(查询/更新/删除),然后把余下的部分传给了Predicate, 例如findByAuthorOrTitle(以下的解析把这个方法名作为例子),那么传给Predicate的就是AuthorOrTitle

下面这些静态变量则是定义了合法的方法名前缀,从这些变量可知道查询方法的前缀不仅仅只支持“find”,😊同时也支持“read/get/query/steam”.这些可在官方文档没提及。

1
2
3
4
5
6
7
8
9
10
11
12
13
14
15
16
17
18
19
20
21
22
23
private static final String KEYWORD_TEMPLATE = "(%s)(?=(\\p{Lu}|\\P{InBASIC_LATIN}))";
private static final String QUERY_PATTERN = "find|read|get|query|stream";
private static final String COUNT_PATTERN = "count";
private static final String EXISTS_PATTERN = "exists";
private static final String DELETE_PATTERN = "delete|remove";
private static final Pattern PREFIX_TEMPLATE = Pattern.compile( //
"^(" + QUERY_PATTERN + "|" + COUNT_PATTERN + "|" + EXISTS_PATTERN + "|" + DELETE_PATTERN + ")((\\p{Lu}.*?))??By");


public PartTree(String source, Class<?> domainClass) {

Assert.notNull(source, "Source must not be null");
Assert.notNull(domainClass, "Domain class must not be null");

Matcher matcher = PREFIX_TEMPLATE.matcher(source);

if (!matcher.find()) {
this.subject = new Subject(Optional.empty());
this.predicate = new Predicate(source, domainClass);
} else {
this.subject = new Subject(Optional.of(matcher.group(0)));
this.predicate = new Predicate(source.substring(matcher.group().length()), domainClass);
}

Predicate

那么Predicate的逻辑又是怎样的呢?Predicate主要是根据repository的方法名,通过关键字“Or”,把方法名split成多个子字符串,构造OrPart, 多个OrPart最终在mongo的查询里就会解析成了$or.例如AuthorOrTitle就会被拆成Author和Title然后构造成两个OrPart对象。

1
2
3
4
5
6
7
8
9
10
11
12
13
14
15
public Predicate(String predicate, Class<?> domainClass) {

String[] parts = split(detectAndSetAllIgnoreCase(predicate), ORDER_BY);

if (parts.length > 2) {
throw new IllegalArgumentException("OrderBy must not be used more than once in a method name!");
}

this.nodes = Arrays.stream(split(parts[0], "Or")) //
.filter(StringUtils::hasText) //
.map(part -> new OrPart(part, domainClass, alwaysIgnoreCase)) //
.collect(Collectors.toList());

this.orderBySource = parts.length == 2 ? new OrderBySource(parts[1], Optional.of(domainClass))
: OrderBySource.EMPTY;

OrPart

从OrPart的构造函数可以看出,这里是把Source拆成构造成List\<Part>,以Author作为例子,由于也不包含”And”,所以只会有一个Part对象。

1
2
3
4
5
6
7
8
9
OrPart(String source, Class<?> domainClass, boolean alwaysIgnoreCase) {

String[] split = split(source, "And");

this.children = Arrays.stream(split)//
.filter(StringUtils::hasText)//
.map(part -> new Part(part, domainClass, alwaysIgnoreCase))//
.collect(Collectors.toList());
}

Part

Part主要设置了两个成员变量

1
2
3
4
5
6
7
8
9
10
11
12
13
14
15
16
17
18
19
20
21
22
23
24
25
26
27
28
29
30
31
32
33
34
35
36
37
38
39
40
41
42
43
44
45
46
47
	public Part(String source, Class<?> clazz, boolean alwaysIgnoreCase) {

Assert.hasText(source, "Part source must not be null or empty!");
Assert.notNull(clazz, "Type must not be null!");

String partToUse = detectAndSetIgnoreCase(source);

if (alwaysIgnoreCase && ignoreCase != IgnoreCaseType.ALWAYS) {
this.ignoreCase = IgnoreCaseType.WHEN_POSSIBLE;
}

this.type = Type.fromProperty(partToUse);
this.propertyPath = PropertyPath.from(type.extractProperty(partToUse), clazz);
}
```

1. [type](https://github.com/spring-projects/spring-data-commons/blob/70ac316b400937d7e1dff71c1605a4205fc818bd/src/main/java/org/springframework/data/repository/query/parser/Part.java#L149) - 主要保存了该条件的类型,BETWEEN, IS_NOT_NULL等等, 对于例子中的**author**关键字,则会解析为Type.SIMPLE_PROPERTY,表示EQUAL.
2. propertyPath - 属性名, **author**

**看到这里,初始化的逻辑基本完毕, Repository的方法最终会被解析并且保存成PartTree, 查询的时候只需要从PartTree生成mongo语句**

### MongoQueryCreator
[MongoQueryCreator](https://github.com/spring-projects/spring-data-mongodb/blob/17d61004261c388a98bf1cc932318db69073db2f/spring-data-mongodb/src/main/java/org/springframework/data/mongodb/repository/query/MongoQueryCreator.java#L174)从该方法可看出从Part构建出Criteria的过程。

```java
private Criteria from(Part part, MongoPersistentProperty property, Criteria criteria, Iterator<Object> parameters) {

Type type = part.getType();

switch (type) {
case AFTER:
case GREATER_THAN:
return criteria.gt(parameters.next());
case GREATER_THAN_EQUAL:
return criteria.gte(parameters.next());
case BEFORE:
case LESS_THAN:
return criteria.lt(parameters.next());
case LESS_THAN_EQUAL:
return criteria.lte(parameters.next());
case BETWEEN:
return criteria.gt(parameters.next()).lt(parameters.next());
case IS_NOT_NULL:
return criteria.ne(null);
case IS_NULL:
return criteria.is(null);
case NOT_IN:

总结

  1. 扫描路径下继承Repository的接口(当有多个spring data模块存在时,则会限定到MongoRepository)的类生成代理。
  2. 解析接口名生成PartTree,执行的时候根据对应PartTree生成Criteria条件,传给MongoTemplate.

彩蛋

  1. 😆看源码过程中发现SurroundingTransactionDetectorMethodInterceptor枚举类可继承接口

Druid连接池获取超时问题解决

发表于 2018-04-03 |

背景

线上某台机器出现频繁的获取mysql连接超时

排查步骤

  1. 通过日志可以看出服务时获取连接池超时

    1
    2
    3
    4
    5
    6
    7
    8
    9
    10
    11
    12
    2017-07-14 13:10:01,973 [DubboServerHandler-10.25.65.225:20900-thread-174] ERROR com.alibaba.dubbo.rpc.filter.ExceptionFilter (ExceptionFilter.java:87) -  [DUBBO] Got unchecked and undeclared exception which called by 10.25.68.15. service: com.bilin.user.dynamic.service.IUserDynamicService, method: queryNewestDynamicMsgByUser, exception: org.springframework.jdbc.CannotGetJdbcConnectionException: Could not get JDBC Connection; nested exception is com.alibaba.druid.pool.GetConnectionTimeoutException: wait millis 10000, active 0, dubbo version: 2.4.9, current host: 10.25.65.225
    org.springframework.jdbc.CannotGetJdbcConnectionException: Could not get JDBC Connection; nested exception is com.alibaba.druid.pool.GetConnectionTimeoutException: wait millis 10000, active 0
    at org.springframework.jdbc.datasource.DataSourceUtils.getConnection(DataSourceUtils.java:82)
    at org.springframework.orm.ibatis.SqlMapClientTemplate.execute(SqlMapClientTemplate.java:183)
    at org.springframework.orm.ibatis.SqlMapClientTemplate.executeWithListResult(SqlMapClientTemplate.java:220)
    at org.springframework.orm.ibatis.SqlMapClientTemplate.queryForList(SqlMapClientTemplate.java:267)
    at com.bilin.sdk.dao.base.BaseDAO.queryForList(BaseDAO.java:27)
    Caused by: com.alibaba.druid.pool.GetConnectionTimeoutException: wait millis 10000, active 0
    at com.alibaba.druid.pool.DruidDataSource.getConnectionInternal(DruidDataSource.java:1071)
    at com.alibaba.druid.pool.DruidDataSource.getConnectionDirect(DruidDataSource.java:898)
    at com.alibaba.druid.filter.FilterChainImpl.dataSource_connect(FilterChainImpl.java:4544)
    at com.alibaba.druid.filter.stat.StatFilter.dataSource_getConnection(StatFilter.java:661)
  2. 猜测可能的原因

    • 并发量太高
      从数据上看,每秒不到1k请求,后端mysql服务器的负载也不高,所以这个原因基本排除
    • 连接池连接数设置过低
      业务设置的minIdel 100, maxConnection 300, 所以这个原因基本排除。
    • mysql服务故障
      部署在别的机器上的服务,还有使用同一个db实例的其它业务没出现异常情况,所以这原因概率不大
    • mysql链接设置过低
  3. 由于没有比较明显的可能性,所以只能看下源码(版本1.0.5)找下具体的原因。
    DruidDataSource
    异常的抛出是在1071行
    throw new GetConnectionTimeoutException(errorMessage);
    由于设置了链接获取的超时时间

    1
    <property name="maxWait" value="10000" />

    同时由报错的日志可知,连接等待了10秒获取失败,所以可得知执行的方法时pollLast

    1
    2
    3
    4
    5
    if (maxWait > 0) {
    holder = pollLast(nanos); //L 1021
    } else {
    holder = takeLast();
    }

    druid的连接获取,是通过notEmpty和empty两个变量协调线程的同步,pollLast发现没可用连接时,就会notEmpty.await(),同时empty.signal(). emtpy.signal主要唤醒了CreateConnectionThread. 通过了解CreateConnectionThread的源码,发现在某些情况下线程会退出。
    情况1

    1
    2
    3
    4
    5
    6
    7
    8
    9
    10
    11
    12
    13
    14
    15
    16
    17
    18
    19
    20
    21
    22
    23
    24
    25
    try {
    connection = createPhysicalConnection();
    } catch (SQLException e) {
    LOG.error("create connection error", e);

    errorCount++;
    //当错误次数达到设置值时,breakAfterAcquireFailure设置为true时线程会退出
    if (errorCount > connectionErrorRetryAttempts && timeBetweenConnectErrorMillis > 0) {
    if (breakAfterAcquireFailure) {
    break;
    }

    try {
    Thread.sleep(timeBetweenConnectErrorMillis);
    } catch (InterruptedException interruptEx) {
    break;
    }
    }
    } catch (RuntimeException e) {
    LOG.error("create connection error", e);
    continue;
    } catch (Error e) {
    LOG.error("create connection error", e);
    break;
    }

情况2

1
2
3
4
5
6
7
8
DruidConnectionHolder holder = null;
try {
holder = new DruidConnectionHolder(DruidDataSource.this, connection);
} catch (SQLException ex) {
//这里也会退出
LOG.error("create connection holder error", ex);
break;
}

情况1由于在该项目中没设置breakAfterAcquireFailure,采用默认值false,所以情况1不大可能出现,Error属于不可恢复错误,所以退出也合理。
情况2就有点不合理,单个的SQLException也会导致整个的生存线程结束。

  1. 所以接下来主要是确认CreateConnectionThread是否存在异常
    通过jstack grep线程名Druid-ConnectionPool-Create(线程有设置线程名是个好习惯),从grep的结果,发现存在一个CreateConnectionThread,由于业务设置了两个连接池,所以一个是不正常
    1
    2
    # sudo -u www-data jstack 10750  | grep "Druid-ConnectionPool-Create"
    "Druid-ConnectionPool-Create-376416626" daemon prio=10 tid=0x00007faab4039800 nid=0x2ae3 waiting on condition [0x00007faac3ec6000]

继续grep一下Destroy线程,确认是两个线程,所以Destroy线程正常,进一步确认了CreateConnectionThread线程存在问题。

1
2
3
# sudo -u www-data jstack 10750  | grep "Druid-ConnectionPool-Des"
"Druid-ConnectionPool-Destory-376416626" daemon prio=10 tid=0x00007faab403a800 nid=0x2ae4 waiting on condition [0x00007faac3e85000]
"Druid-ConnectionPool-Destory-190586441" daemon prio=10 tid=0x00007faad8fb1800 nid=0x2a3d waiting on condition [0x00007faac9dda000]

  1. 基本确认了是由于CreateConnectionThread不正常结束,所以最后一步就是找寻证据证明线程不正常的结束。通过以上源码,可看到Druid在每一步的异常处理都会记录日志,所以通过日志关键字进行grep,发现在1682行写了个错误日志,对应到的正式线程退出情况2.所以问题的原因就是druid在获取mysql连接后创建DruidConnectionHolder时由于网络原因报了MySQLException导致了CreateConnectionThread退出。

    1
    2
    3
    4
    5
    6
    7
    8
    9
    10
    11
    12
    13
    14
    15
    16
    17
    18
    19
    20
    21
    22
    23
    24
    25
    26
    27
    28
    29
    30
    31
    32
    33
    34
    2017-07-14 00:26:59,609 [Druid-ConnectionPool-Create-190586441] ERROR com.alibaba.druid.pool.DruidDataSource$CreateConnectionThread (DruidDataSource.java:1682) - create connection holder error
    com.mysql.jdbc.exceptions.jdbc4.CommunicationsException: Communications link failure
    The last packet successfully received from the server was 0 milliseconds ago. The last packet sent successfully to the server was 0 milliseconds ago.
    at sun.reflect.GeneratedConstructorAccessor33.newInstance(Unknown Source)
    at sun.reflect.DelegatingConstructorAccessorImpl.newInstance(DelegatingConstructorAccessorImpl.java:45)
    at java.lang.reflect.Constructor.newInstance(Constructor.java:525)
    at com.mysql.jdbc.Util.handleNewInstance(Util.java:411)
    at com.mysql.jdbc.SQLError.createCommunicationsException(SQLError.java:1121)
    at com.mysql.jdbc.MysqlIO.reuseAndReadPacket(MysqlIO.java:3673)
    at com.mysql.jdbc.MysqlIO.reuseAndReadPacket(MysqlIO.java:3562)
    at com.mysql.jdbc.MysqlIO.checkErrorPacket(MysqlIO.java:4113)
    at com.mysql.jdbc.MysqlIO.sendCommand(MysqlIO.java:2570)
    at com.mysql.jdbc.MysqlIO.sqlQueryDirect(MysqlIO.java:2731)
    at com.mysql.jdbc.ConnectionImpl.execSQL(ConnectionImpl.java:2812)
    at com.mysql.jdbc.ConnectionImpl.execSQL(ConnectionImpl.java:2761)
    at com.mysql.jdbc.StatementImpl.executeQuery(StatementImpl.java:1612)
    at com.mysql.jdbc.ConnectionImpl.getTransactionIsolation(ConnectionImpl.java:3352)
    at com.alibaba.druid.filter.FilterChainImpl.connection_getTransactionIsolation(FilterChainImpl.java:347)
    at com.alibaba.druid.filter.FilterAdapter.connection_getTransactionIsolation(FilterAdapter.java:872)
    at com.alibaba.druid.filter.FilterChainImpl.connection_getTransactionIsolation(FilterChainImpl.java:344)
    at com.alibaba.druid.filter.FilterAdapter.connection_getTransactionIsolation(FilterAdapter.java:872)
    at com.alibaba.druid.filter.FilterChainImpl.connection_getTransactionIsolation(FilterChainImpl.java:344)
    at com.alibaba.druid.proxy.jdbc.ConnectionProxyImpl.getTransactionIsolation(ConnectionProxyImpl.java:260)
    at com.alibaba.druid.pool.DruidConnectionHolder.<init>(DruidConnectionHolder.java:92)
    at com.alibaba.druid.pool.DruidDataSource$CreateConnectionThread.run(DruidDataSource.java:1680)
    Caused by: java.net.SocketException: Connection reset
    at java.net.SocketInputStream.read(SocketInputStream.java:189)
    at java.net.SocketInputStream.read(SocketInputStream.java:121)
    at com.mysql.jdbc.util.ReadAheadInputStream.fill(ReadAheadInputStream.java:114)
    at com.mysql.jdbc.util.ReadAheadInputStream.readFromUnderlyingStreamIfNecessary(ReadAheadInputStream.java:161)
    at com.mysql.jdbc.util.ReadAheadInputStream.read(ReadAheadInputStream.java:189)
    at com.mysql.jdbc.MysqlIO.readFully(MysqlIO.java:3116)
    at com.mysql.jdbc.MysqlIO.reuseAndReadPacket(MysqlIO.java:3573)
    ... 16 more
  2. 查看了最新版本1.1.2这部分的代码,发现这部分代码已经重构了,不存在该问题,所以升级版本即可。

总结

  1. 故障的版本时1.0.5,发布于2014年,属于比较旧的版本,开源工具不可避免的会存在bug,所以需要即时的进行升级
  2. 使用开源工具时,尽可能的使用最新的版本。
HongShuwei

HongShuwei

9 日志
E-Mail
0%
© 2021 HongShuwei
由 Hexo 强力驱动
|
主题 — NexT.Pisces v5.1.4